Tuesday, April 29, 2014

My Personal Dos and Don'ts for Classroom Management Part 2

Well hopefully you all checked out Part 1 of this post that focused more the Don'ts that I learned the hard way. In Part 2 I'll show you my list of Dos and I'll admit this list is a little bit longer. I think that good though! When it comes to teaching Art, if you're saying no too much then you've got something backwards. Alright let's do this!

WHAT TO DO! (And I learned the FUN way)

1.) TRUST!

  • There's a reason I put this one first! As middle school teachers I feel we spend WAY too much time worrying about what our student MIGHT do. "I can't give them this material" "They won't be able to do that". No way! This personal style of teaching comes actually from the way I was raised. My mom is well... THE BEST! Growing up she always trusted my brothers and I. Yes, even as teenagers. She trusted us to choose the right option and to not let her down. Did we always do it? No, but the fear of losing mom's trust was WAY worse then missing out on things that were stupid anyways. I apply the same principle in my classroom. I trust my students! I tell them that and they know that trust means fun materials and a relaxed classroom environment. When trust is lost and I need to start "babysitting" my 12-14 year old, they work really hard to win that trust back. Don't waste paint and clean-up properly? We get to do fun painting project! Throwing paint and hiding dirty palettes? (yes, it's happened) We get to spend 10 min of class checking out every materials and 10 min checking them back in. 
2.) 5 Minutes of Voices Off

  • Oh goodness that sounds strict and yes the kids don't 100% love it, but it is incredibly important! As artist we know that groove we get in when we really sink into our artwork. We get lost in the process and before we know it hours have gone by. WE get it! Students need to feel it! I explain to my students that this 5 minutes of voices off will allow them to get into that groove. When the minutes are up, I find that typically students stay on task and get less distracted by their peers. 
3.) Check-ins!

  • Every class I have my students come-in (with a greeting from me), get their portfolios and general supplies. EVERYTHING goes under their desk when that first bell rings. This way their hand are empty and their ears are more focused. With large projects, I literally have the students put their hands in the air like they're getting arrested hehe. Once students are settled I go over announcement, reminders, do understanding check-in, show them new materials, etc. My personal favorite is "Rebel Buck Quizzes". Appleton is on the PBIS system my school has little dollars that we hand out to students for awesome behaviors. It's like a fun mini-quiz! Kiddos love it. 
4.) Make Small Consistent Changes to the Environment (Those fancy books call it "Scaffolding")

  • Middle school is a cluster of change. Students are going through puberty which makes them hypersensitive to change, so throwing a big change at them will make them lock-up. Small changes they don't see or notice though? Works for everyone. For example, my #1 goal is to create independent artists. Not because I just want to sit on my butt and not teach, but because independence forces students to figure it out themselves. PROBLEM SOLVE! (I sang that out loud by the way). Now if I did one project where I gave all the answers students wanted and then the next project I answered none, students would quit! Instead I slow roll it from 6th grade to 8th grade. By the time my students reach 8th grade they barely need me which leaves me available to create WITH my students. AMAZING! (yes singing again)
5.) Keep Thing Numbered and Label, Label, Label

  • Okay so this is a little contradictory to my "Do Trust" mantra but let's face it middle schoolers are spacey! Clean-up is hectic and having things numbered allows me to simply say "who's got Xacto 4". It's better than walking out of class with a weapon, that's for sure. The labeling aspect is my solution to the "did you really ask thats". "Mrs. Koepke? Where's the thumbnail paper?" Instead of wanting to yell "THE SAME PLACE IT'S ALWAYS BEEN!" I get to point or send students on a treasure hunt!
6.) Use of Stop Clock
  • I don't know how I survived without this! Last year was a constant struggle to get class started or get students back after collaborative work...but now! I project this stop watch and like magic my voice is saved! Here's the one I use http://www.online-stopwatch.com/ 
7.) Tell Your Students Why, Right Away
  • Expecting students to just MAKE the connections between projects and the world is just not going to happen. Connections didn't start clicking for me until college. "Oh yeah! I understand that Freshmen Year lesson now". Why leave it such a mystery? Avoid the "why do we have to learn this?" tendency by well...TELLING THEM right off the bat. I always have a slide, discussion, etc. with my students about how this new lesson connects with our previous lesson, how this lesson will benefit them as artists and people and how each lesson connects with the bigger picture! Yes! Every lesson. Even one dayers. If you link this one with #4 before you know it you'll just ask "why does this matter" and the students will answer. It rocks!
8.) Keep Content Challenging!
  • Okay, honesty time. Sometimes I'm browsing Pinterest and come across a middle school art project that like, "Ummm...I think you meant appropriate for Pre-K". Challenging students at any age level is incredibly important. How will students grow if we do the color wheel in Elementary, Middle and High school? The one thing I will brag about is my ability to PUSH my students. I never underestimate my students and I don't let them underestimate themselves. Giving-up is okay for five minutes but then right back at it! 
9.) Let Your Students Give-up (but not for long)

  • Yes I said it! Let your student give up. Seriously. Frustration is one of the most natural responses to the creative process and frustration+middle school= WAHHHHH!!!!!. I teach my students how to realize when they are getting frustrated with their work and how to give up...but not for long. When I'm doing my own artwork, I will get literally angry sometimes. If I said someone over my shoulder telling me, "well this is art time and we do art now" I'd go crazy too. Soon after however I come back revisit the piece with a clear mind and fresh eyes. Students will do the same. 
10.) Have Back-up Options for Early Finishers AND Off-Taskers

  • So part of our job is to get these kiddos the information about materials, art history, process, etc. but there will ALWAYS be kids that just aren't having it. Disrespect, swearing, talking back, misusing materials (like REALLY misusing) is going to happen. ESPECIALLY in middle school. It might be one project or all the projects, but having back-up options for off taskers is just as important as back-up options for early finishers.  When a student of mine just isn't listening to any form of reason I can offer, back-up task is my final offer. Unfortunately it  sometimes has to be done to maintain a healthy learning environment for ALL students. My favorites are apology letter, think tank write-up and in extreme cases alternative projects where students research and reflect about the concepts we are working on. I know that can sound harsh or like I'm making reading and writing a punishment, but I want the students to get the information one way or another. If they can't do the hands-on route then they'll do the studying route. 
11.) Let Your Students Help you Lesson Plan 
  • Nobody knows what makes sense to middle schooler better than a middle schooler. Some of you may have read my "Understanding Armatures" post, where I described how I gave the students the option of how to best execute the project. I just could figure out which way would best serve my students, so I asked them. I showed them what I thought were two ways to achieve the similar results and then we discussed which made sense. In this discussion I got confused, they got confused, I made suggestions and they made suggestions. By the end of the discussion, WE had creatively solved how to best do this project. Now don't get me wrong, I came with the goods. I explained all the things mentioned in #7 and definitely had the background knowledge to keep the discussion moving in a constructive way, but theres a reason why those projects turned out so awesome...they students got invested in their learning. Shhh....don't tell them. 

12.) I'm just going to smoosh a  bunch of random Dos here....
  • Keep making art!
  • Make make art with your students! Right next to em'! Don't worry, everything won't fall apart
  • Be silly with your kids
  • Be yourself
  • Get to know your students
  • Give your students space
  • Sleep
  • Eat
  • and Laugh...oh goodness, please laugh :)


Monday, April 28, 2014

My Personal Dos and Don'ts for Classroom Management Part 1

Alright...so some of these are definitely going to be redundant to every list created entitled "Classroom Development" but I want to share the ups and downs I have experienced teaching middle school. For those of you reading who are either teacher of middle school or parents of middle school students, you know just how challenging this age group can be. Angsty is one of my new favorite words, let's just leave it at that. Each classroom and each group of students comes with their own challenges and it's our job to tailor make each class to fit the needs of our students. This can either be really challenging or really easy, but a good groundwork is essential (I feel) to get every class off on the right foot. Not to toot my own horn, but in a recent observation of a group from UW-Oshkosh a college student told me that I have some of the best classroom management they see. I of course scoffed because as a second year teacher I am in NO WAY perfect and will never be as perfect as some of you rockstar bloggers. That why Part 1 of this post starts like this:

WHAT NOT TO DO (But I learned the hard way)

1.)Match disrespect with disrespect

  • When students are just blatantly disrespectful and the broken record or reason is just NOT    working it is really easy to lose your cool.  I've done it and I just did it a couple of days ago. When you feel yourself fighting with a students, you've lost the battle. Find a way to calm the storm before you lose it!
2.) Be a "best friend"
  • We all want our students to like us and let's face it they do, because we teach THE BEST subject ever, but there has to be a line. Students need to understand that your are the adult, that what you say goes and that respect isn't optional. 
3.) Freeze up or let things go un-talked about
  • Being a new teacher is SCARY! You are put into situations you never expected to deal with and until you face them head on you'll never grow as a teacher. When something small happens, perhaps a student says something slightly mean, don't let it go unaddressed! EVER! Make a point to talk to the student one on one. See what's going on with him/her or just explain how their actions weren't acceptable. If you let the little things slide, monsters will be born!
4.) Make them rely on your opinion
  • "Does this look right" "Did I get a good grade?" are things I hear almost everyday. Students have been so conditioned to worry about the end result and forget to enjoy the process. The phrase from "What Teachers Make" pops into mind, "I can make a C+ feel like a congressional medal of honor and I can make an A- feel like a slap in the face". Getting your students to SLOW down and think things through will honestly make them concentrate hard, better themselves and behave in your classroom. 
5.) Threaten Them 
  • Oh boy...this is a big one and one I struggle not to do. "Put that cell phone away or I'll write you up!", "Use those materials wisely or you won't use them at all"....oh geez....did I just say that? Yes I did but I've been working on stopping. You see the threat might work for RIGHT NOW but it doesn't for next week, month, year, or life time. Change it to be "What is the school policy on cell phones?" or "materials are here for everyone, please rethink your actions". 
6.) Respond to Shout-outs EVEN IF students are just really excited about what you're teaching
  • Once that door is open, it's always an option. It is so challenging when you finally get that group of students who is just busting at the seams to talk about art and express their opinions about a topic to forget the Golden Rule of classrooms; always raise your hand. I tell you though, once you've let one kid do it, they ALL do it. 
7.) Fear to stray from the Rubric
  • Assessment is important, don't get me wrong but sometimes student's creativity goes far beyond five points for layering "proper shading". I make exceptions all the time! If a student can justify why they did their project deems "breaking a rubric guideline" then I simply cross it off. When students finish their self grading I ask them to write discussion points in the comments section. 
8.) Take it Personal
  • Some students won't like you or they won't like your class. Don't take it personal and don't stop pushing them to at least try. 
9.) Over think mistakes
  • I've made them, you've made them and we'll make them again (hopefully not the same ones). When a day just goes AWFUL, let yourself reflect and feel down for like ten minutes then get back on that horse and teach those kiddos. Turn to a friend or fellow teacher to get fresh perspective on what to do differently next time. I guarantee they've made the same mistake. 
10.) Forget your Art Kids
  • Okay, something we all hate to talk about. There will always be that group of kids who are like "The Art Kids". There in Art Club, they take as many art classes as they can, they are planning to pursue art after high school, etc. They are just "Art Kids". You want to find that fine line between encouraging them and showing preferential treatment. This can be difficult, my personal favorite way is secretly slipping my "Art Kids" extra challenges to address in the class projects. They seem to respond well :) 
"There are so many more you're missing!" you say? Well, I agree. Please add your BIGGENS' in the comments. I'm always looking for new ideas :) 


Sunday, April 27, 2014

Deconstructing with Impressionism

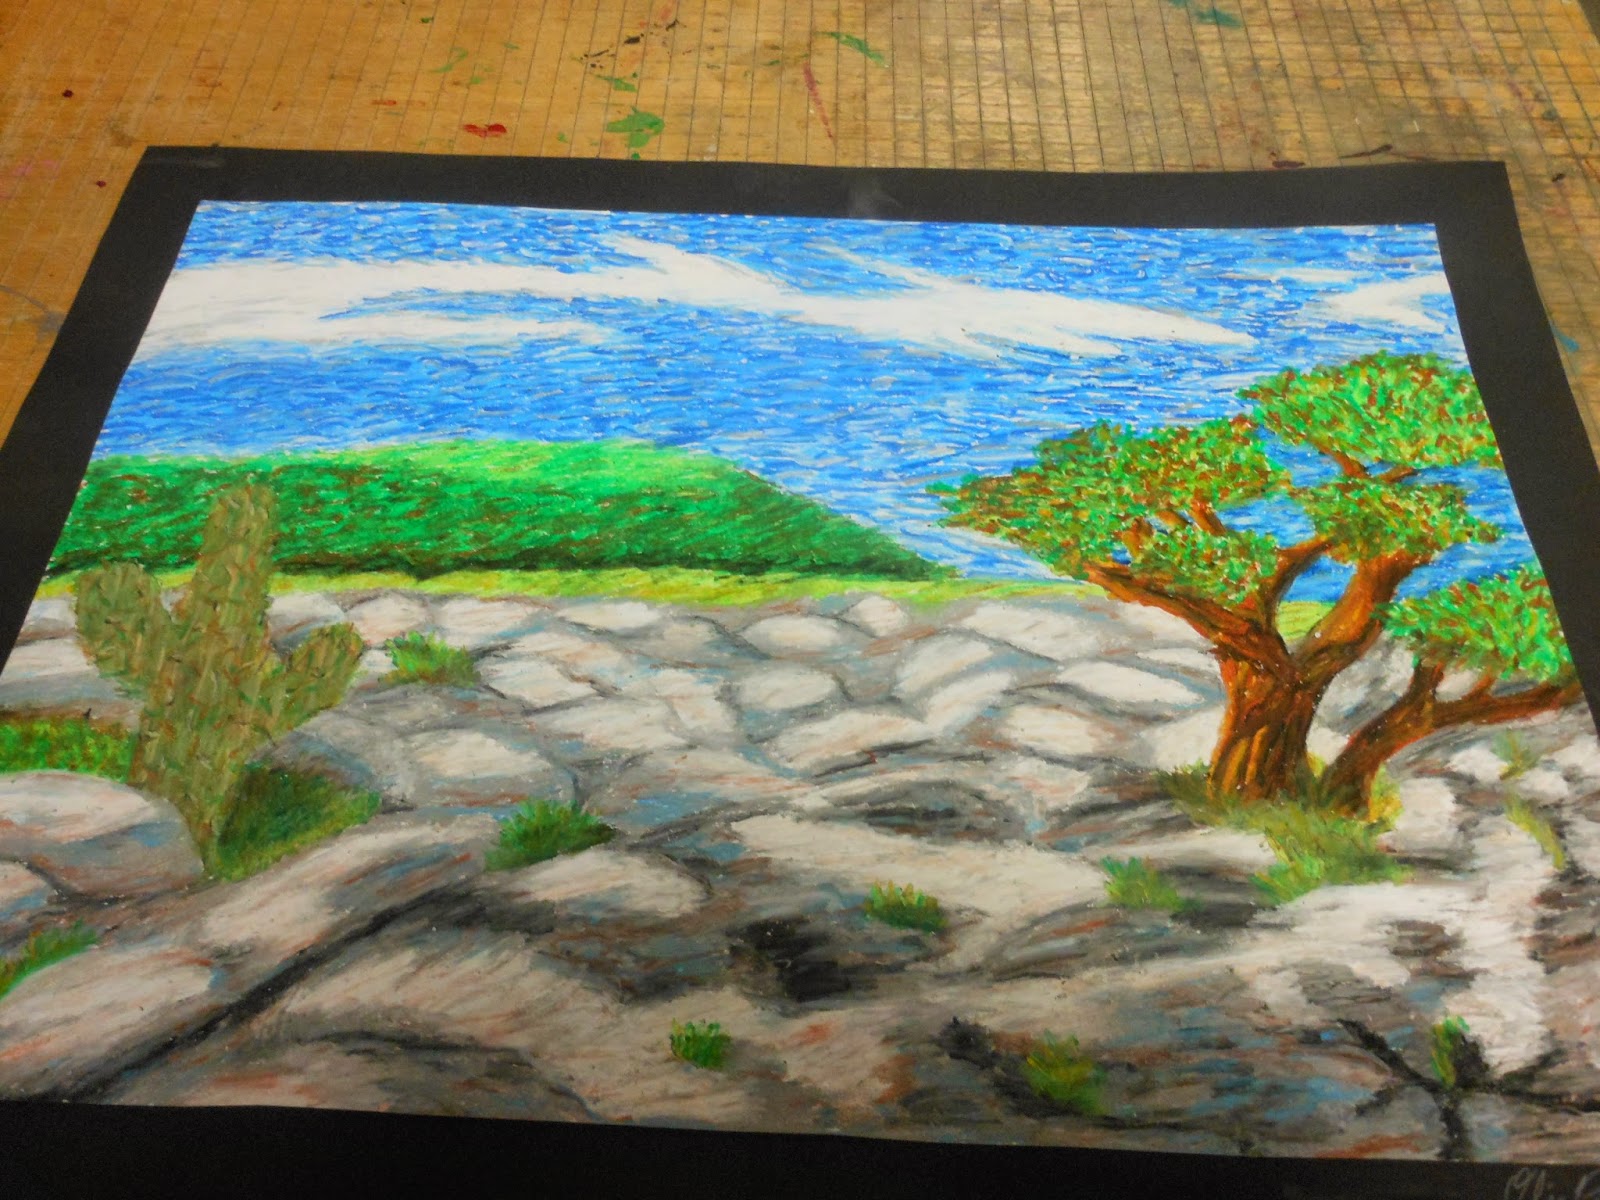
How do you get your students to notice ALL the fantastic colors that make up the world around us?  I feel like I spend A LOT of time working with my students on layering, layering, layering mediums like colored pencil, watercolor, and pastels and yet I still just get green grass, brown trees, etc. After my first failed attempt at just showing them "this is what to do", I just wasn't getting the results I was hoping for. Then I thought....DECONSTRUCT! How did I not think of this? I'm putting that in the category of "first year teacher" even though this is my second year. Having students deconstruct the process artist use really helps them SLOW it  down! Teaching middle school in the age of technology means students want answers fast! Nuhuh. Not going to happen. I'm going to make you work for it! Muwahhahaha!

This is a project I did with my 8th grade students to help them deconstruct and understand how colors can and SHOULD be layered together to make dynamic compositions. Inspiration? Impressionism. I apologize for the angled photos...first time for my student helper. 


I told students that they couldn't "color" large sections of their paper and they had to layer at least three colors in each section of their landscapes. I got a lot of "But Mrs. Koepke there are only two blues in the box", in which I replied with my favorite "figure it out". This really made my students look close and understand all the wonderful colors the world is made of. TEACHER WIN!

Please share your project ideas for making students slow down and deconstruct!

Friday, April 25, 2014

Art Show!

I've been in the process of getting student excited about putting pieces into the upcoming Art Show. I decided to send out a few videos. Most of them were rather funny (but show kiddos so I can't share here), but my husband, who is a fantastic videographer, helped me make this video. Inspired by one of my favorite directors, Wes Anderson. Enjoy! Thanks Adam Koepke :)


Wednesday, April 23, 2014

Reverse Shading

There are so many different ways to teach students to shade. I usually attempt the three step process where students start by placing the medium tone, then build and pull in the lowlights, and finally erase for the highlights. I also encourage students to try LOT of different techniques, since again there is no one perfect way to shade. HOWEVER, even with practice I still have students that struggle to create that wide range of value we all desire for in realism pieces. I tend to have a lot of really dark, muddled projects or super light barely noticeable shading.  So I decided to mix it up a little. REVERSE SHADING!

Instead of having my student work with traditional charcoal on white drawing paper, I had them use white charcoal on black paper. This caused a lot of upset students at first. Having to think about an image backwards was definitely a challenge for most my students, but once they got the hang of it they were hooked. In 100% honesty, this exercise of having students notice the lights in an image benefited my students shading abilities greatly! I HIGHLY recommend this to any beginning shaders! Enjoy!


I'm sure you have all hear of "The Compassion Project", well this is one of the 8th grade projects that went with our "Art of Compassion" art show this year. I will be doing a later post with more specifics, but for this project students were asked to choose subject matter that represented compassion in some way to them. Let's just say, I was blown away with not only their imagery but the way they challenged themselves with subject matter. Check back in for more on "Art of Compassion" later :)


Monday, April 21, 2014

Changing Surrounding with 1-Point Perspective

So hopefully you didn't get turned-off by the words 1-point perspective. We all know it's important to teach but there's not much creativity wrapped up in this 'step-by-step' process. There have been some really great perspective projects floating around Pinterest lately and when I came across artist Ben Heine I was inspired to get the perspective ball rolling with my 6th grade students. If you haven't checked out Ben's work check it out here: http://www.benheine.com/.

I had a really great time getting deeper than the 1-point perspective with my students by challenging them to change their surroundings. They were asked to pick a background that was 'boring' and use art/perspective to change it into something spectacular. A lot of students chose brick walls, doors, or a side walk, but what was really awesome is all the different ways they chose to change them. So here you go. Yet another perspective project, but hopefully it will inspire you to think a little further :)


Just love the exploding quality! An awesome piece. 


Not for those afraid of heights :)

Great use of texture

She just thought the grey circle in the middle was a little boring :)

For this project students learned 1-point perspective (obvie), basic shading, foreground, middleground, background, atmospheric perspective and were encouraged to include some of the lessons from our previous projects :) Hope you enjoyed. 


Friday, April 18, 2014

Creative Uses of Negative Space

One aspect that I really work hard on is challenging my students. Challenging them to find their own answers, question their work and others, and challenging them with difficult concepts. Sometimes the students get frustrated when I ask "Well, what do you think" instead of just answering the question, but we can all attest to how this can help a student grow in their artistic talents.

The challenge for this project? How can we utilize negative space to make new positive space? If you're turning your head in confusion, then you are right where my students started. Then I introduced these images http://imgfave.com/view/2708446. We discussed in length how these images use negative space to create new positive space. This took quite awhile for the students to really grasp and A LOT of thumbnails sketching. Here's what they came up with

Negative space from the 'E' makes positive space of buildings OR Negative space from buildings make positive space for 'E'

Inspired by tessellations. Negative space between soccer balls makes kites and landscape 


Willow branches make hair for portrait.


Some were more successful than others but all created very interesting compositions. Some of my favorites not pictured because students swept them away before I could snap a picture. They were just too excited to share (hopefully in upcoming Art Show) I was very impressed with my 7th graders :) They took this challenge on head first. 

Tuesday, April 15, 2014

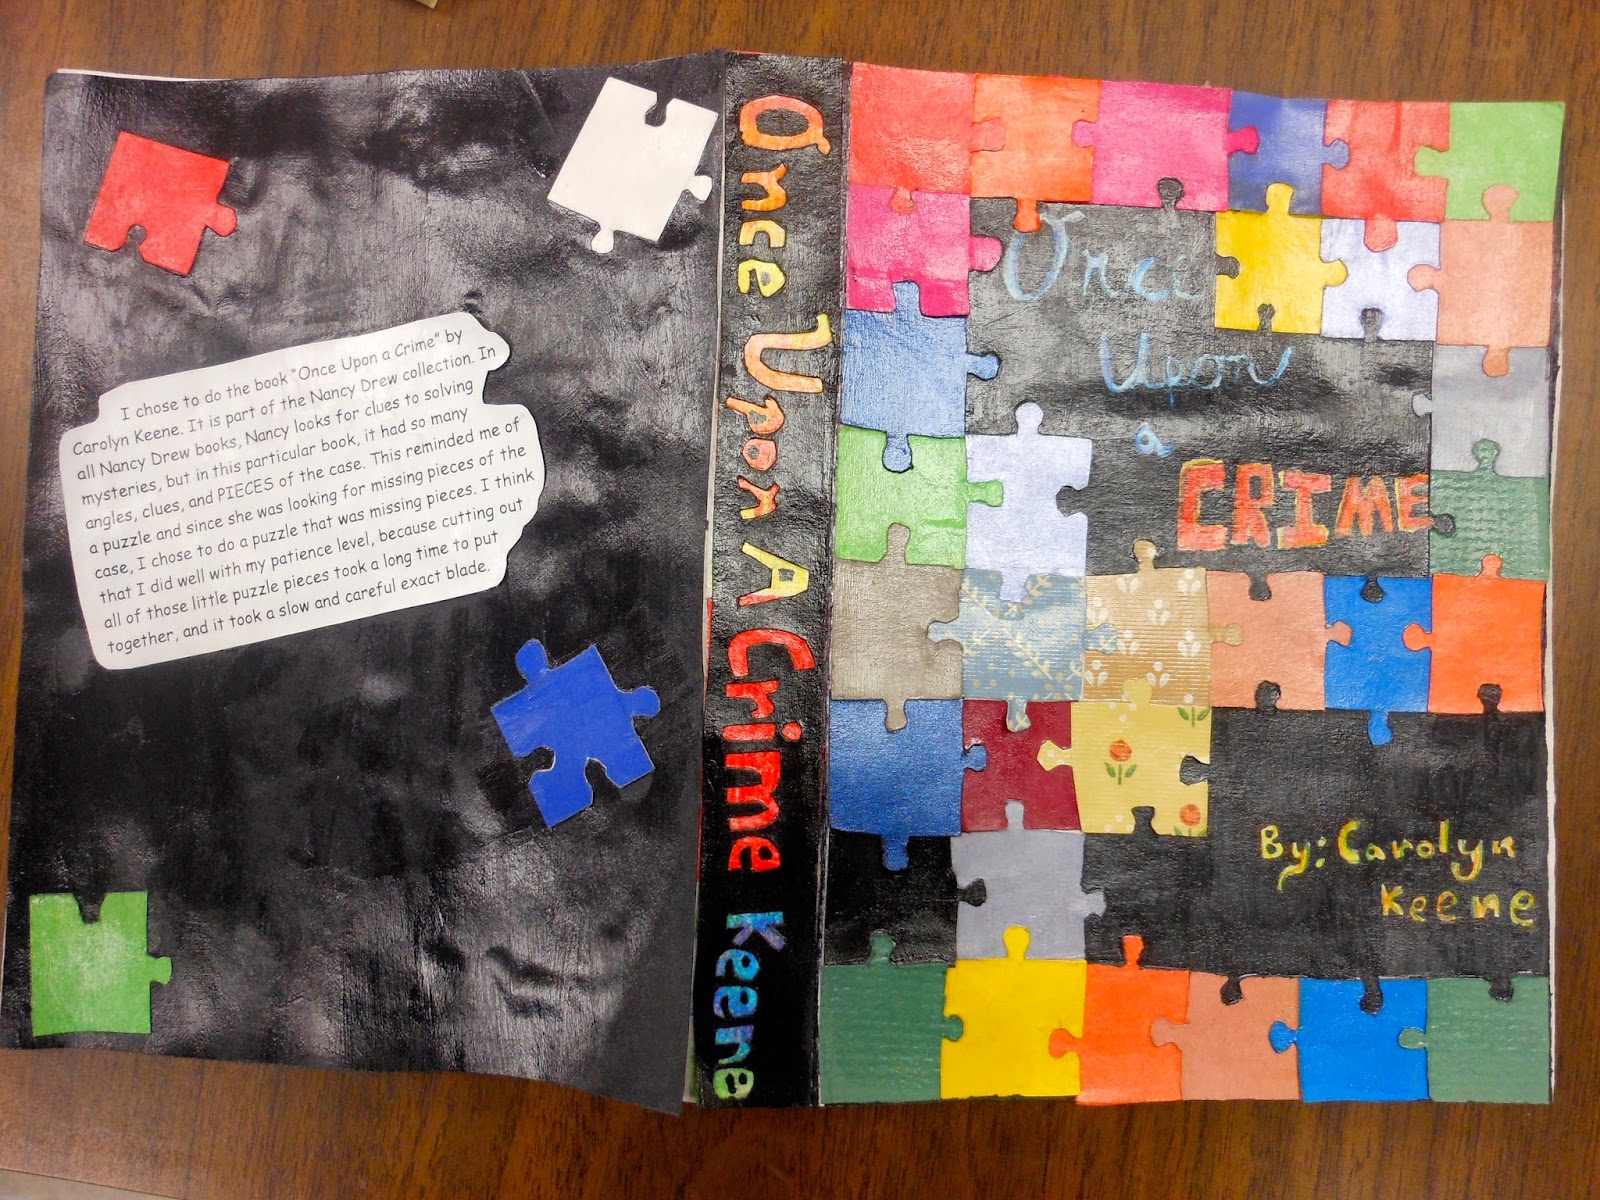
Book Covers- A Lesson in Graphic Design

This year I've been exploring different artist careers with my 8th graders. Graphic Design was a clear choice. There are 100's of fun projects that I could have done and my love of typography and minimalist graphics brought me 1000s of ideas (with a little help from Pinterest). Then I remembered seeing this series of book covers http://www.sinch.us/classic-childrens-stories-vol-1/  and a project was born. Also a fun way to tie in some of those literacy goals!

My students were asked to come up with a new cover for one of their favorite books. I started them off with a lesson on typography and layout,  and let them run from there. They had a choice of colored pencil, paper layering or collage as their materials. My 8th graders just love open ended projects!  Instead of the classic book description on the back cover, I had the students include their artist statements.


Sorry for the shiny photos. Some students used mod-podge to give their book cover a glossy look


Charlotte's Web creator used newspaper words to create a web, which symbolized Charlotte's use of words taken from newspaper in the book


One of the only students who decided to do the inside folds as well :)


I encouraged my students to create a layout that flowed well between the front, spine and back portions of their covers. If you're interested in trying this project in your class, here are the dimensions I gave my students for creating the different components of the cover. Fit standard book for display :) Add extra inches to the length (20") if you want your students to have extra space for practice. I left this a choice for my students. 


Sunday, April 13, 2014

Brain-Break Lesson #1

IMPORTANT! Please read through the whole post to get the full effect. Phase one may make me seem like a terrible teacher, but I promise it's just an intro to a fun lesson.

I think we've all had the experience of students getting a little restless during long projects. This often results in quickly shaded backgrounds or sloppy painting. Everyone needs a brain break. Here's one a my favorite quick lessons. Subject? Creativity! Time: 40 min

Phase One: The Repetitive Bunny (could really be any animal, but it's SPRING so let's bunny it up!) 

  • Students should receive one sheet of WHITE paper and one pencil (my student bring one to each class)
  • Instruct students that today we will be doing a drawing lesson and they should EXACTLY follow the instructions without talking. If you feel comfortable use a sternish/boring teacher voice.
  • Here are the exact words I use with my students as I'm drawing the steps on a whiteboard. The wording a designed to NOT allow students to stray from the directions. 
    • Start by drawing a circle in the middle of your paper. Not too high and not too low, right in the middle.
    • In the center of this circle draw an upside down triangle. This triangle should be equal on all sides. 
    • Above this triangle draw two small circles. DO NOT COLOR THEM IN!
    • Coming off this bottom of the triangle, draw a forwards 'J' and backwards 'J'. This should look like how you would maybe draw a cat's mouth
    • On either side of the triangle, draw three diagonal lines. NOT TWO, NOT FOUR, THREE.
    • Finally at the top of the circle  draw two 'upside-down socks' facing in opposite directions. 
The final drawing should look like this: 

After the bunnies are drawn have the students turn and compare their images to the neighbors'. 

Discussion Questions:

  • How did you feel during the process of drawing the bunny?
  • What did you notice about your bunny compared to your neighbor's bunny?
  • If you had the opportunity, what would you do to change your bunny drawing?
In my experience students often first notice the differences between their bunny and their neighbors bunny, but they notice that they all look relatively the same. They also usually agree that the process was boring and they wish they could add color, a body and detail to their bunny drawing. I respond by asking, "what if art was like this everyday?" I usually get groans. Then we talk about why creativity thinking is so important to the work we do in the Art room and why sometimes the creativity falls away. 

Creativity and the ability to explore different possibilities is one of the best parts about Art class. The are 100's of ways to do every art project and keeping students to a step-by-step process can be limiting to their creative growth. Students like a little freedom. As frustrating as it may be for them, the creative process is one of the greatest experiences they'll have in the Art room. 

Phase Two: Bunnies, No Boundaries.   
  • Students should receive a bucket of misc. materials. Just whatever you have extra of! Literally anything you want to give them. And a pair of scissors. 
  • Tell the students to make a bunny using only whats in the bucket, nothing else
  • THAT'S IT!!!
Some students start asking "can I" or "is it okay if" questions during the process, in which I always answer YES! (well almost always)

About midway through the supplies start running low in their buckets. This is when I tell them, "your bunny needs a friend, please make one". You'd be surprised the things students come up with during this part. I've had students re-make their whole bunny to accommodate for making a friend, draw on their hands to make a friend, bring in their original bunny with additions and so many other crazy things. 

I don't let the students use glue on this 'project'. At the end of class they say good-bye to their bunny friends and set-up the activity for the next class.  My goal isn't assessment or high-quality work. My goal is to shake off the project boredom and get the creative juices flowing again. I find that when student return to or start their projects again, they are filled with new creative outlook. Here are some examples of the bunnies and their friends


"Can my bunny have two friends?" YES!!


Love this little spool friend :)


Project subtable for ALL ages. I've done it with 6th, 7th and 8th grade and they all LOVED the little brain break :)  Also great for a beginning of the year project!

Thursday, April 10, 2014

Projects Seen Round the World

I am so excited to share this project with you! It has been one full year since this project was completed and there is a reason that I waited! For the passed year these little sculptures have been traveling around the United States (well most of them)!

I did this project with my 8th grade students during my student teaching experience. The students task? Create a small sculpture to travel through the world of geocaching. For some background:

Geocaching is a worldwide treasure-hunting game that uses GPS coordinates. Participants use a GPS device (anything from an SmartPhone to specially made devices) to locate specific coordinates where the "cache" has been hidden. Once found, participants can take a small token in exchange for one they place and sign a log book. It's a world-wide phenomenon and some of the most fun I've had! Here are some images of MY geocaching adventures-


Take a look at all those trinkets!


 This one took some serious climbing to get. Luckily this stranger was willing to hang over the water to help out. 


Geocaching in North Carolina...found it!


My brother Erich holding up the Logbook after signing it. Location: side of the road on drive to North Carolina.


That small black case on my husband's shoulder? A GEOCACHE. Cleverly called a Nanocache, this type doesn't hold trinkets, just log book. Located on the underside of a military tank. 


Kelsey from Artsy Fartsy Art Room likes Geocaching too!


So...incorporating geocaching into the classroom? 

I started by introducing my students to geocaching through a virtual geocache I made that allowed the students to learn about longitude and latitude, map reading and geocaching rules. I then asked students "Geocaching and art? How are they linked". Well geocaching has a big following in the artist community. There are geocaches that require you to submit a piece of artwork or sketch your log entry, there are even artists that design installation art pieces to house their caches. Just Google "Geocache, Art" and the list is endless. Needless to say the students were SO excited. Then I told them about Travel Bugs....

Travel Bugs are trinkets that have been tagged and travel from geocache to geocache. The creator sets a goal for their bug and finders help move the bug to reach their goal. 

My students each create their own Travel Bug using ceramics! Now, I couldn't have placed 50 ceramic projects into local geocaches and not every student wanted to give their project up. I ended up putting SIX projects into actual geocaches. The rest? I created several fake caches around school and students used GPS coordinates to find them. Once they found the caches they could either just take their own project or trade with a friend. Fun right? But what about the SIX Travel Bugs sent off on real geocaching journeys? 
Here's the Travel Bugs all tagged up and ready for their journey!

Well this is why I've waited a year to reveal this project! They have been traveling a year and most of them are still traveling. Some got "stolen" or placed in permanent collections of geocachers but one little guy is on the journey of a life time...Here's the story of Guppy the ceramic pirate fish. 
Here is Guppy's profile picture. He started his journey in Oshkosh, WI in 2013. On his profile he asks to be placed in geocaches close to water. The student wrote as the description of Guppy, "Guppy is a sword fighting gold fish who travels the world looking to sight see and fight off evil and protect the fish in trouble"
Guppy was quickly picked up by a business man who was in WI for a conference. Guppy's next stop was the lovely mountains of Colorado. The business man uploaded this breathtaking picture to show Guppy accomplishing his journey! 

After his trip to Colorado, Guppy was taken to Idaho and then spent about half a year traveling around Utah. 

Guppy's time in Utah was a little rough. One of his Utah finders posted Guppy's current condition and then very thoughtfully fixed him up. All that evil fighting really toughened Guppy up :)


Guppy is currently recovering in Wonderwood Park located in the beautiful Washington. 

I was so excited to see how far Guppy had gone! Currently two of the six original Travel Bugs have been "stolen", Guacamole the frog is traveling around Florida, Bobbie the banana is enjoying Kansas and Happy Feet the Penguin is still roaming Wisconsin. Even though the other Travel Bugs didn't get quite as far as Guppy, I feel this project was a 100% success. The students really enjoyed learning about Geocaching, I got to sneak a little cross-curricular instruction in and the world of geocaching gained some fantastic art pieces. The students were given a copy of their Travel Tag so that they can track their art as it travels the world. One year in, who knows how far these little guys could go!

Interested in geocaching? Hit up www.geocaching.com to get started!